Showing posts with label Hair. Show all posts

Monday, September 12, 2011

The Fishtail Braid

Photo Source: Cosmopolitan.com


 HOW TO:  Fishtail Braid


One of the braids that I get a lot of compliments on is the Fishtail braid.  This is also called The Herringbone braid because it looks very similar to a tight Herringbone pattern.Within a couple tries anyone can make a perfect fishtail braid in their sleep and have one of the trendiest hairstyles. The fishtail braid is so popular in part because it is so simple, but also because it is the perfect combination of playful and sophisticated.


Here are some great instructions I found from thebeautydepartment.com . They say that their secret tip is clear elastic rubberbands...

Items you will need: 2 clear elastics, scissors,  and lots of patience :)
Steps:
  • If you want a smoother braid, brush your hair out first. For a messier braid, leave the natural texture and separate the hair with your fingers.
  • Create a ponytail using a clear elastic.
  • Split the ponytail into two separate pieces.
  • Take a piece from the first side and pass it to the 2nd side.
  • Next take a piece from the 2nd side and pass it back to the 1st side.
  • Once you’ve finished your braid, go in with your scissors and CAREFULLY cut the clear elastic at the top.
  • Optional: gently pull on the pieces to loosen it up if you wish!
Photo Source: http://thebestfashionblog.com

When you’re fishtail braiding, don’t think too hard! You’re simply making X’s. Also, remember that when you take the little piece from one side and pass it to the other side, you don’t need to keep track of it.

Heres a video for more help:


Some tips:

  • The skinnier the strand you use, the more intricate the braid will look. In general try to use the same thickness throughout or your braid will look uneven.
  • You can use bobby pins to secure flyaways.
  • For thicker hair, consider using thicker strands than skinnier which you would use for thinner hair.
  • Doing the fishtail braid while your hair is wet will give you a firmer grip and more precise braid.

Sunday, August 7, 2011

Summer Hair - Waterfall Braid

Photo Source: www.lovemaegan.com                                                                                                                         


 I first saw this braid a few months back and L-O-V-E  Love it ! I've been asked several times how to do it and so I thought I would post a tutorial online. Whats great about this hairstyle is that is works for anyone- short hair, long hair, curly hair, or straight hair. It adds a very bohemian look to your every day do. 

Photo Source: www.headcandy.com


The waterfall braid is a great summer look for strolling on the beach or a night out on the town; here are some step by step instructions from headcandy.com : 

Step One:
To start, part your hair the way you want it and be sure to brush out any tangles. If you want to add waves to your hair it’s best to do this before you start with the waterfall braid. Then take a section from the front of your hair, right on your parting and split it into 3, just like a normal braid.

Step Two:

Take the top section of your 3 sections and place it over the middle section, then take the bottom one and place over the middle section just as if you were doing a normal plait/braid. Angle your hands so that your hair is moving towards the back of your head and not down the side of your face for the next step.

Step Three

Before you move your top section over to the middle once again, you will need to pick up a little more hair from right beside the section, combine this with that section and fold over the middle section.

Step Four

Now instead of folding the bottom section over the middle you should drop that hair and pick up the section of hair that is hanging loose next to this section. As you fold this over the middle section you will see the section you dropped is now acting like a waterfall.

Step Five

You should continue with steps 3 and 4 until you have reached the point at which you want to stop! Some people start their waterfall braids on one side and continue all the way around and end with a normal braid/plait, others do one on each side and join them together and many just have them on the one side and secure them with a pretty accessory.


Here is a Youtube tutorial I found on www.lovemaegan.com for extra help:


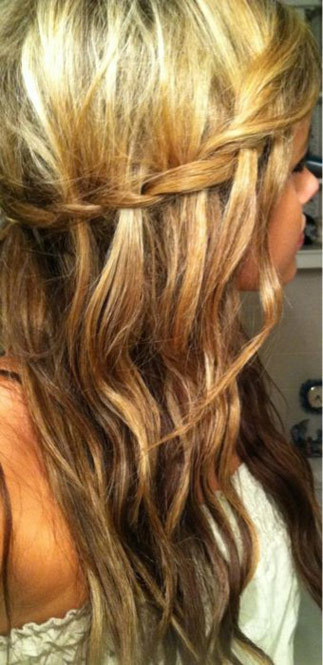
Here's my version of the waterfall braid :)


Sunday, July 31, 2011

Go Retro- Tie Dye Hair :)


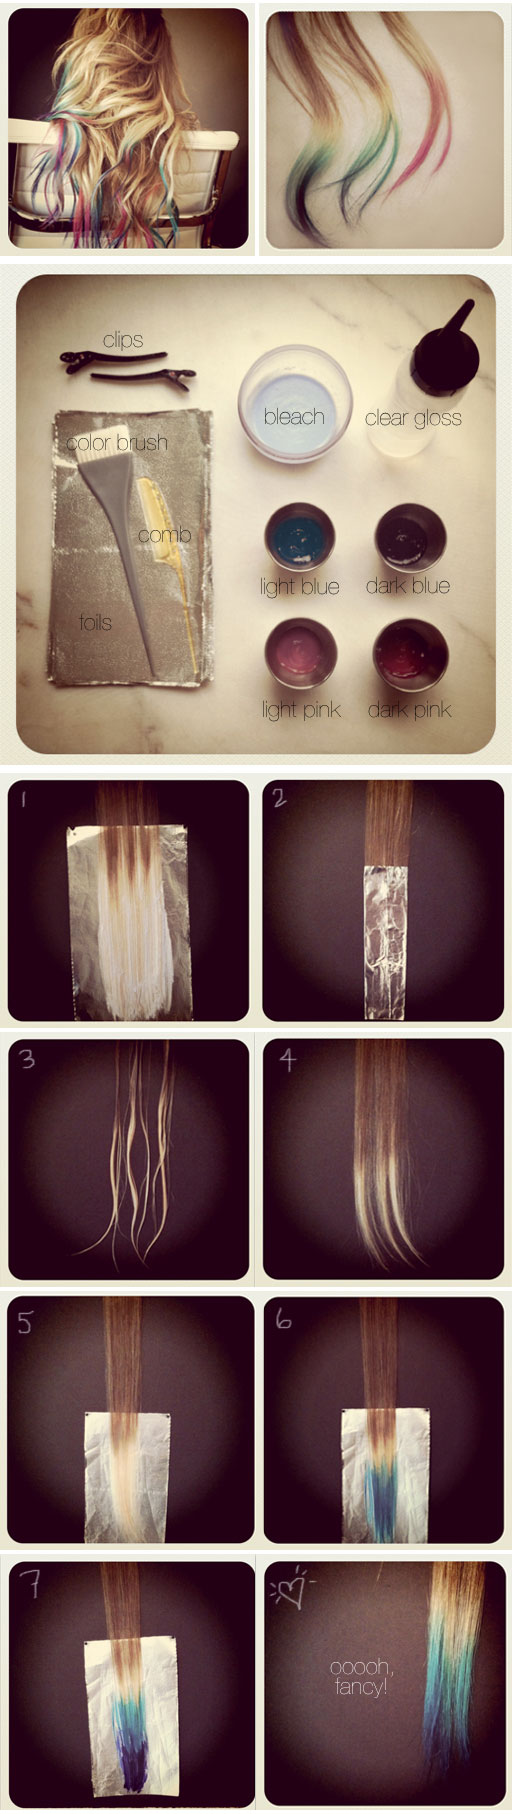
all photos: Kristin Ess + thebeautydepartment.com

My Sister was in town last weekend and asked me "Hey have you seen Lauren Conrad's new hair?' So I googled Lauren Conrad and saw these beautiful colored cascading curl. I looked up a tutorial on Lauren’s temporary bright colors and found one on the Beauty Department which has a step by step guide. Here is the process for you in 7 steps on an extension. While the stylist said she would never recommend bleaching out the ends of your hair at home, if you want to do the fun colors yourself, maybe get the tips bleached out by a pro + then play with the temporary colors on your own. The best things about this color– you’re able to hide it in a bun for work if you need to, AND you’re only doing a couple of inches on the bottom so it won’t kill you to cut it off if you get over it quickly.


TOOLS: highlighting comb, clips, foils, color brush, hair bleach with the appropriate volume (always seek a professional when using bleach), light pink color, dark pink color, light blue, dark blue, clear gloss.

Step 1 Highlight the tips of the hair using hair bleach with the correct volume. I lightened the bottom 3 inches of  hair, taking it as light as possible without causing any damage. As you can see above, I like to “feather” on the bleach. Painting a jagged line makes it blend better.

Step 2 Fold up your foil and let it process until it reaches a pale blonde. Use the appropriate heat if necessary.

Step 3 Shampoo and lightly condition bleach out of the hair.

Step 4 Blow hair completely dry. If it’s still wet, it will soak up less color.

Step 5 Place the hair on a foil. Imagine the bleached out part being split into 3. You’re going to leave the top 1/3 blonde.

Step 6 Next, paint the light blue (or whatever color you choose) on the entire bottom 2/3.

Step 7 Paint the very tips (or bottom 1/3) using the darker version of that color. It should look almost feather like. Be sure to blend. Last, rinse out the color. I highly suggest washing them out one piece at a time and towel drying well so the colors don’t bleed into each other. If they do, you may see a “marbleizing” effect. I love when the colors all swirl together like that, but if you’re looking to keep them more defined, keep them away from each other when they’re wet. I like to finish up by sealing it with a clear gloss. That’s a professional use only product so if you don’t have access to it, you don’t have to do that. Blow dry and…Tah Daaah!!

This is such a fun summer trend and I hope everyone finds their own fun way of doing it. This is the time to get creative. Once it fades from the sun, pool, beach, or general wear, it becomes a pastel version which I think  is equally gorgeous! Color care shampoo can help keep your bright color from fading. Condition well and again, don’t let the wet strands sit next too each other too long if you don’t want the colors blending.

Let me know if anyone tries it.... I'm thinking about going to Sallys and getting some blond extensions and trying it out on them :)