Showing posts with label how to. Show all posts

Sunday, December 18, 2011

Christmas Cake Pops Tutorial

Happy Holidays Everyone!!! 


Christmas is just around the corner and if your looking for a creative and easy sweet treat to make this holiday season cake pops are just the thing. On Bakerella.com they have a bunch of different types of cake pops for any occasion.

If you've never made cake pops here is a great tutorial from Bakerella.com:

1 box cake mix (cook as directed on box for 13 X 9 cake)
1 can frosting (16 oz.)
Wax paper
Candy melts (1 lb. pkg.)
Lollipop sticks

  1. After cake is cooked and cooled completely, crumble into large bowl.
  2. Mix thoroughly with 1 can frosting. (I use the back of a large spoon, but it may be easier to use fingers to mix together. But, be warned, it will get messy. Also, you may not need the entire can of frosting, so start out by using almost the entire can and add more if you need to.)
  3. Roll mixture into quarter size balls and place on wax paper covered cookie sheet. (Should make 45-50)
  4. Melt candy melts in the microwave per directions on package. (30 sec intervals, stirring in between.)
  5. Dip the tip of your lollipop stick in a little of the melted candy coating and insert into the cake balls. (Insert a little less than halfway.)
  6. Place them in the freezer for a little while to firm up.
  7. Once firm, carefully insert the cake ball into the candy coating by holding the lollipop stick and rotating until covered. Once covered remove and softly tap and rotate until the excess chocolate falls off. Don’t tap too hard or the cake ball will fall off, too.
  8. Place in a styrofoam block to dry.


Today I decided to try making Christmas Tree Pops and Santa Hat Cake Pops. 

Santa Hats

Hats: Red Candy Melts and White Candy Melts
Fur: white sugar crystal sprinkles
Balls: white coated expresso beans, gumballs, yogurt covered peanuts will work
Paper Lollipop Sticks

Make the Hats: Make a cone shape instead of a ball. Put in the freezer until firm. Then, holding the top part of the hat, dip the bottoms in white candy melts, insert the lollipop stick and set in a styrofoam block to dry. Once dry, dip the tops in red candy melts so that it meets where the white ends. Gently place the balls to the top of the hat while still wet. Let them dry. Then, use a toothpick to generously dab more white candy melts all around the bottom of the hat. While still wet, sprinkle the sugar crystals on.

Christmas Trees

Trees: Green Candy Melts
Stars: Jumbo Star Sprinkles
Ornaments: Rainbow chip sprinkles
Paper Lollipop Sticks
 Decorate the trees: Make a cone shape instead of a ball and insert the lollipop sticks as usual. Place in the freezer until firm. Dip the entire tree in green candy melts. While still wet, you can use a toothpick to create the branches. When the trees are dry, you can also use toothpicks to apply a drop of green melted candy to the tree in the places you want the ornaments to be.

Monday, October 3, 2011

How to: Halloween Decorations!


Halloween is definitely one of my favorite holidays. I love playing dress up, curling up on the couch watching scary movies, going to haunted houses, and all the other fun fall activities that this time of year brings. Another thing I love, is to decorate our house for Halloween. Every year Martha Stewart comes out with her Halloween Magazine and thought I would share some of her creative ideas to add some Spooktacular decor and sweet treats to your home! 


Shivering Bats Shade How-To

Photo Source: marthastewart.com

Photo Source: marthastewart.com

Photocopy template to desired size; cut out. Using a white wax pencil, trace shape onto black construction paper; cut out. To suspend bats, make a ring from 20-gauge brass wire that fits just inside top of shade, resting on the shade spokes; a translucent white paper lampshade works best. Take a piece of white thread to bat; tie other end to ring. Repeat, hanging bats at varying heights and taping others to lampshade. (If you don't want to have to spend a lot of time cutting out the template from Martha Stewart, you can buy pre-made bats at Michael's that are the same as the template.)


Creepy Candles How to

Cast a sinister glow over any setting with a cluster of white tapers dripping with "blood" (actually red candle wax). Fill a cup or a small pail with sand, and plant white candles inside so they stand upright. Light a red candle and tip it over the white candles so the wax drips down the tops and sides, being careful not to burn yourself. Let wax cool completely before removing candles from sand.


Photo Source: marthastewart.com

Deranged Halloween Arrangement How-To
  1. Use permanent glue to attach vinyl bugs to rose petals.
  2. Paint vinyl snakes using black acrylic paint; let dry. 
  3. Use floral wire to create anchors for coiled snakes: twist 1 end around the snake's middle. Insert other end in vase. 
  4. Secure centipede (or other big bug) to vase with poster putty.
Tools and Materials


Witch Fingers Cookies

Photo Source: marthastewart.com

I first saw these amazing looking cookies a couple years ago in Martha Stewarts Halloween magazine, and thought I would share this neat recipe!

  • Yield Makes 30

  • Ingredients

    • 2 tablespoons red food coloring
    • 30 blanched almonds
    • 2 large eggs
    • 1/4 teaspoon pure vanilla extract
    • 8 tablespoons unsalted butter (1 stick), room temperature
    • 1/2 cup confectioners' sugar
    • 5 tablespoons granulated sugar
    • Pinch of salt
    • 1 2/3 cups all-purpose flour

    Directions

    1. Heat oven to 350 degrees. Line two baking sheets with Silpats (French nonstick baking mats) or parchment paper, and set aside.
    2. Place food coloring in a shallow bowl. Using a small paintbrush, color one rounded half of each almond. Set aside to dry.
    3. Separate 1 egg. Set aside the white. In a small bowl, whisk together yolk, remaining egg, and vanilla. Set aside.
    4. In the bowl of an electric mixer fitted with the paddle attachment, combine butter, confectioners' sugar, granulated sugar, and salt. Beat on medium speed until well combined. Add egg mixture, and beat until smooth, about 2 minutes. Add the flour, and mix on low speed just until incorporated. Wrap the dough in plastic, and chill until firm, 20 to 30 minutes.
    5. Divide the dough in half. Work with one piece at a time, keeping remaining dough covered with plastic wrap and chilled. Divide the first half into 15 pieces. On a lightly floured surface, roll each piece back and forth with palms into finger shapes, 3 to 4 inches long. Pinch dough in two places to form knuckles. Score each knuckle lightly with the back of a small knife. Transfer fingers to prepared baking sheets. Repeat with remaining dough.
    6. When all fingers are formed, brush lightly with egg white. Position almond nails; push into dough to attach.
    7. Bake until lightly browned, about 12 minutes. Cool completely


    Candy Corn Candles How To:


    Items you will need:

    White Candles any size
    Candy Corn
    Large Glass Candle Holder

    Place candy corn inside the larger candle holder till you fill it up about half way. Add your white candle and continue to add candy corn to your liking. PS- don't eat the candy after burning the candle...  Garnish with some fall leaves.


    Get creative!!! If you're on a budget look at the Dollar Tree Store, they have some great deals and some of the same items Party City and Michaels have! For the Martha Stewart collection look at Michaels.

    Here are some pics from our house this Halloween!


    Sunday, September 25, 2011

    How To Make: Pumpkin Spice Latte ( just like Starbucks)


    It only comes around once a year and it must be that time, because I’ve seen several Facebook and Twitter posts, of course I’m talking about the Pumpkin Spice Latte from Starbucks. Now you can enjoy this delicious treat all year round with this recipe.
    Photo Source: Starbucks.com
    Available only in the Fall as a seasonal drink from Starbucks the Pumpkin Spice Latte is, as described by Starbucks.com:
    "Signature espresso blended with the unmistakable spices of fall – cinnamon, nutmeg and clove – smooth with steamed milk and topped with delectably sweetened whipped cream."


    Pumpkin Spice Latte

    Receipe [via TheKitchen.com

    makes 1-2 servings
    Ingredients:
    2 cups milk
    2 tablespoons canned pumpkin OR 1 teaspoon of Torani Pumpkin Spice Syrup (your choice)
    2 tablespoons sugar or sugar substitute – you can halve this amount
    2 tablespoons vanilla extract
    1/2 teaspoon pumpkin pie spice
    1-2 shots espresso (about 1/4 cup of espresso or 1/2 cup of strong brewed coffee if you don’t have an espresso machine.)
    Directions:
    In a saucepan combine milk, pumpkin and sugar and cook on medium heat, stirring, until steaming. Remove from heat, stir in vanilla and spice, transfer to a blender and process for 15 seconds until foamy. If you don’t have a blender, don’t worry about it – just whisk the mixture really well with a wire whisk.
    Pour into a large mug or two mugs. Add the espresso on top.
    Optional: Top with whipped cream and sprinkle pumpkin pie spice, nutmeg, or cinnamon on top.

    Monday, September 12, 2011

    The Fishtail Braid

    Photo Source: Cosmopolitan.com


     HOW TO:  Fishtail Braid


    One of the braids that I get a lot of compliments on is the Fishtail braid.  This is also called The Herringbone braid because it looks very similar to a tight Herringbone pattern.Within a couple tries anyone can make a perfect fishtail braid in their sleep and have one of the trendiest hairstyles. The fishtail braid is so popular in part because it is so simple, but also because it is the perfect combination of playful and sophisticated.


    Here are some great instructions I found from thebeautydepartment.com . They say that their secret tip is clear elastic rubberbands...

    Items you will need: 2 clear elastics, scissors,  and lots of patience :)
    Steps:
    • If you want a smoother braid, brush your hair out first. For a messier braid, leave the natural texture and separate the hair with your fingers.
    • Create a ponytail using a clear elastic.
    • Split the ponytail into two separate pieces.
    • Take a piece from the first side and pass it to the 2nd side.
    • Next take a piece from the 2nd side and pass it back to the 1st side.
    • Once you’ve finished your braid, go in with your scissors and CAREFULLY cut the clear elastic at the top.
    • Optional: gently pull on the pieces to loosen it up if you wish!
    Photo Source: http://thebestfashionblog.com

    When you’re fishtail braiding, don’t think too hard! You’re simply making X’s. Also, remember that when you take the little piece from one side and pass it to the other side, you don’t need to keep track of it.

    Heres a video for more help:


    Some tips:

    • The skinnier the strand you use, the more intricate the braid will look. In general try to use the same thickness throughout or your braid will look uneven.
    • You can use bobby pins to secure flyaways.
    • For thicker hair, consider using thicker strands than skinnier which you would use for thinner hair.
    • Doing the fishtail braid while your hair is wet will give you a firmer grip and more precise braid.

    Sunday, August 21, 2011

    Go Bold!

    Photo Source: The Beauty Department
    At Fall 2011 Fashion Shows this year (Sonia Rykel, Ralph Lauren, Thakoon, Mui Mui Ready-to-Wear) bright colored lips were all the rage. Purples, Fuchsias, Oranges and Reds…And it’s easy to translate this trend into real life by remembering these simple guidelines:

    Pick a creamy or matte formula lipstick while avoiding shimmer, metallic and glossy finishes.
    Go more minimal on the rest of your face by skipping eyeshadow or opting for a lighter shade. If it’s a must for you, cheat liner between your lashes or only inside on your waterline.
    Go ahead and go bold with your mascara by applying a couple coats.

    Will you try this new trend for Fall?

    Sunday, August 14, 2011

    Sunday- Sundaes!!!!!


    Happy Birthday to my Grandad Sam!
    Today he is 86 years old and I thought I'd try a new recipe for Chocolate Fudge Sundae Cupcakes! In pictures I saw online they looked De-Lish and after tasting them they were! The cupcakes themselves were very time consuming so if you have a free afternoon then I recommend trying it out-- because if you love chocolate then these are a must try! And of course they are too cute.

    These Chocolate Sundae Cupcakes don't have any ice cream in them, but only resemble sundaes (sorry, you ice-cream-o-holics). But they just may be better than an ice cream sundae. The base is a chocolate cake, which is then cored and filled with chocolate ganache, piped with vanilla buttercream, and then topped with sprinkles and a cherry, oh yes, and more ganache.

    Here is the recipe I got from http://clclt.com/ :


    Chocolate Cupcakes
    Makes 12 cupcakes

    Ingredients

    1 cup sugar
    3/4 cup + 2 tablespoons all-purpose flour
    1/4 cup + 2 tablespoons cup cocoa powder
    3/4 teaspoon baking powder
    3/4 teaspoon baking soda
    1/2 teaspoon salt
    1 egg
    1/2 cup milk
    1/4 cup vegetable oil
    1 teaspoon vanilla extract
    1/2 cup boiling water
    sprinkles
    maraschino cherries
     
    Method
    Heat oven to 350°F. Line muffin cups (2-1/2 inches in diameter) with paper baking cups.
    Stir together sugar, flour, cocoa, baking powder, baking soda and salt in large bowl. Add eggs, milk, oil and vanilla; beat on medium speed of mixer 2 minutes. Stir in boiling water (batter will be thin). Pour batter into prepared pans.
    Fill cups 2/3 full with batter. Bake 22 to 25 minutes or until wooden pick inserted in center comes out clean. Cool 10 minutes; remove from pans to wire racks. Cool completely.
    Once cooled, core the cupcakes to take out the middles. Don't core them all the way through though – you still want some on the bottom. Just 2/3 deep works. Fill cupcakes with chocolate ganache (recipe below). Save any leftover ganache because you will be using it for the ganache glaze(see recipe below). Frost with buttercream (recipe below) using a round piping tip, then drizzle on chocolate ganache glaze over buttercream. Add the sprinkles before the ganache cools. Push a maraschino cherry into the top of each mound of frosting. Enjoy!!!

    Chocolate Ganache Filling

    Makes enough to fill 12 cupcakes, and for glaze
    Ingredients
    8 ounces semisweet chocolate
    2/3 cup heavy cream
    2 tablespoon butter, room temperature

    Method
    Chop the chocolate and transfer it to a heatproof bowl. Heat the cream until simmering and pour it over the chocolate. Let it sit for one minute and then stir until smooth. Add the butter and stir until combined.

    Vanilla Buttercream Frosting
    Makes enough to frost 12 cupcakes

    Ingredients
    6 ounces (1 1/2 sticks) unsalted butter, softened
    8 ounces confectioners’ sugar, sifted 1/4 teaspoon pure vanilla extract

    Method
    Beat butter with a mixer on medium-high speed until pale and creamy, about 2 minutes.
    Reduce speed to medium. Add sugar, 1/2 cup at a time, beating after each addition, about 5 minutes. (After every 2 additions, increase speed to high, and beat for 10 seconds, then reduce speed to medium-high). Add vanilla, and beat until buttercream is smooth.

    Chocolate Ganache Glaze

    Ingredients
    Leftover Chocolate Ganache Filling
    1 tablespoon corn syrup

    Method
    Add corn syrup to the leftover ganache. Heat over a double broiler and stir until smooth and shiny.

    Here's a dissected cupcake:


    Sunday, August 7, 2011

    Summer Hair - Waterfall Braid

    Photo Source: www.lovemaegan.com                                                                                                                         


     I first saw this braid a few months back and L-O-V-E  Love it ! I've been asked several times how to do it and so I thought I would post a tutorial online. Whats great about this hairstyle is that is works for anyone- short hair, long hair, curly hair, or straight hair. It adds a very bohemian look to your every day do. 

    Photo Source: www.headcandy.com


    The waterfall braid is a great summer look for strolling on the beach or a night out on the town; here are some step by step instructions from headcandy.com : 

    Step One:
    To start, part your hair the way you want it and be sure to brush out any tangles. If you want to add waves to your hair it’s best to do this before you start with the waterfall braid. Then take a section from the front of your hair, right on your parting and split it into 3, just like a normal braid.

    Step Two:

    Take the top section of your 3 sections and place it over the middle section, then take the bottom one and place over the middle section just as if you were doing a normal plait/braid. Angle your hands so that your hair is moving towards the back of your head and not down the side of your face for the next step.

    Step Three

    Before you move your top section over to the middle once again, you will need to pick up a little more hair from right beside the section, combine this with that section and fold over the middle section.

    Step Four

    Now instead of folding the bottom section over the middle you should drop that hair and pick up the section of hair that is hanging loose next to this section. As you fold this over the middle section you will see the section you dropped is now acting like a waterfall.

    Step Five

    You should continue with steps 3 and 4 until you have reached the point at which you want to stop! Some people start their waterfall braids on one side and continue all the way around and end with a normal braid/plait, others do one on each side and join them together and many just have them on the one side and secure them with a pretty accessory.


    Here is a Youtube tutorial I found on www.lovemaegan.com for extra help:


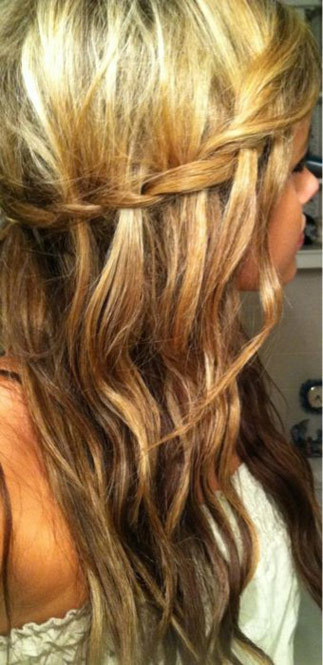
    Here's my version of the waterfall braid :)


    Sunday, July 31, 2011

    Go Retro- Tie Dye Hair :)


    all photos: Kristin Ess + thebeautydepartment.com

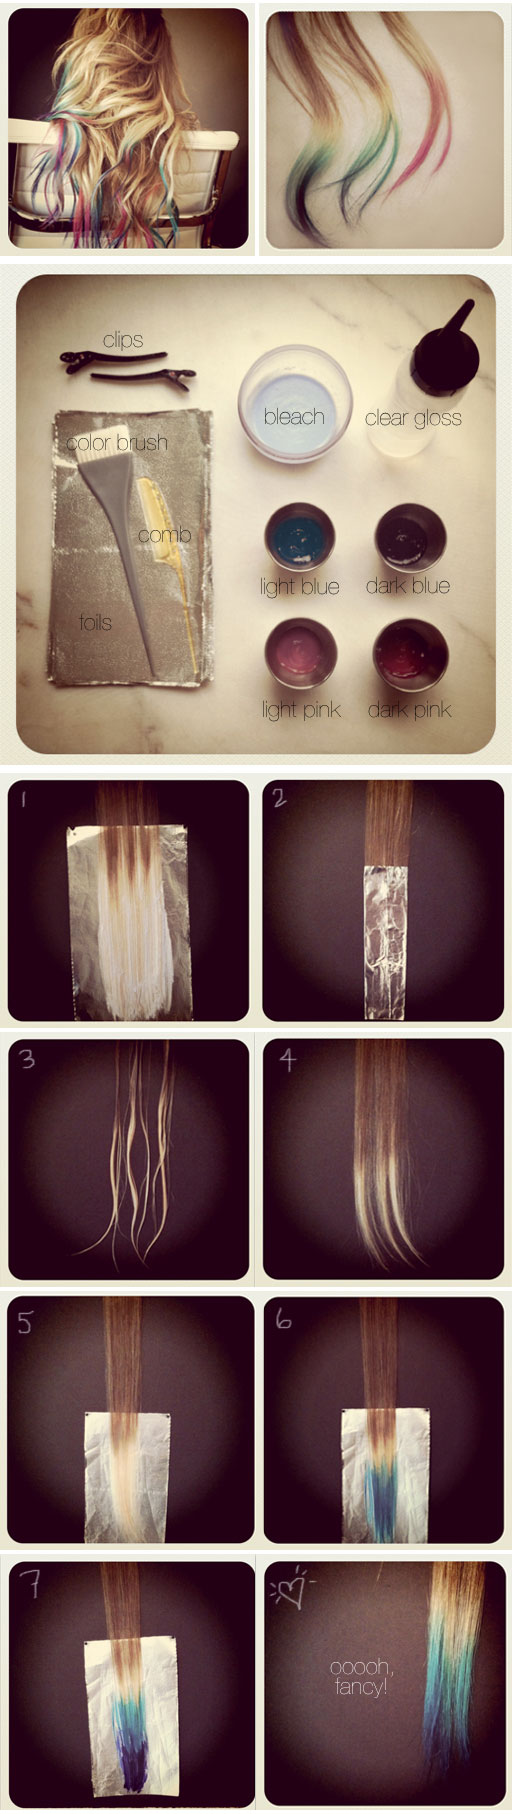
    My Sister was in town last weekend and asked me "Hey have you seen Lauren Conrad's new hair?' So I googled Lauren Conrad and saw these beautiful colored cascading curl. I looked up a tutorial on Lauren’s temporary bright colors and found one on the Beauty Department which has a step by step guide. Here is the process for you in 7 steps on an extension. While the stylist said she would never recommend bleaching out the ends of your hair at home, if you want to do the fun colors yourself, maybe get the tips bleached out by a pro + then play with the temporary colors on your own. The best things about this color– you’re able to hide it in a bun for work if you need to, AND you’re only doing a couple of inches on the bottom so it won’t kill you to cut it off if you get over it quickly.


    TOOLS: highlighting comb, clips, foils, color brush, hair bleach with the appropriate volume (always seek a professional when using bleach), light pink color, dark pink color, light blue, dark blue, clear gloss.

    Step 1 Highlight the tips of the hair using hair bleach with the correct volume. I lightened the bottom 3 inches of  hair, taking it as light as possible without causing any damage. As you can see above, I like to “feather” on the bleach. Painting a jagged line makes it blend better.

    Step 2 Fold up your foil and let it process until it reaches a pale blonde. Use the appropriate heat if necessary.

    Step 3 Shampoo and lightly condition bleach out of the hair.

    Step 4 Blow hair completely dry. If it’s still wet, it will soak up less color.

    Step 5 Place the hair on a foil. Imagine the bleached out part being split into 3. You’re going to leave the top 1/3 blonde.

    Step 6 Next, paint the light blue (or whatever color you choose) on the entire bottom 2/3.

    Step 7 Paint the very tips (or bottom 1/3) using the darker version of that color. It should look almost feather like. Be sure to blend. Last, rinse out the color. I highly suggest washing them out one piece at a time and towel drying well so the colors don’t bleed into each other. If they do, you may see a “marbleizing” effect. I love when the colors all swirl together like that, but if you’re looking to keep them more defined, keep them away from each other when they’re wet. I like to finish up by sealing it with a clear gloss. That’s a professional use only product so if you don’t have access to it, you don’t have to do that. Blow dry and…Tah Daaah!!

    This is such a fun summer trend and I hope everyone finds their own fun way of doing it. This is the time to get creative. Once it fades from the sun, pool, beach, or general wear, it becomes a pastel version which I think  is equally gorgeous! Color care shampoo can help keep your bright color from fading. Condition well and again, don’t let the wet strands sit next too each other too long if you don’t want the colors blending.

    Let me know if anyone tries it.... I'm thinking about going to Sallys and getting some blond extensions and trying it out on them :)