Fierce Foilage —
This abstract leaf design is a fashion-forward homage to autumn. You'll need a top coat, a black nail art polish, and warm-hued lacquers in shades of gold, rust, and burnt orange
 | |||
| Photo Source: http://www.refinery29.com/ |
There should be a large "leaf" on each nail; you can create this by painting a three-pronged dollop. Don't worry if it's not super-defined — you're going to fix that later. Add random blobs of alternating color all around your leaf, until they cover your whole nail.
Using your black nail art polish, outline your leaf and add a stem. Pick two or three blobs on the top, bottom and sides of your nails and outline their edges as well. This will create the effect of multiple leaves piled on top of each other. Wait for the lines to dry, then add a layer of top coat to seal the design.
She's My Cherry Pie —
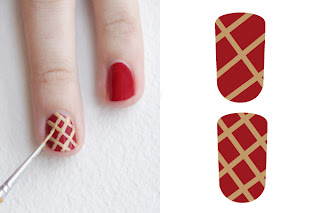
This drool-worthy design is just as scrumptious as its namesake, but without all the calories. You'll need a rich red shade for the "filling," a warm beige for the "crust," and a thin brush for the design work.
Begin by painting your whole nail with your red filling color, then wait for it to dry. Starting in the center, use a thin brush dipped in the beige polish to paint three diagonal lines across your nail.
Now take your brush and create three more diagonal lines going in the opposite direction. This will create the lattice crust effect.
Careful! These delish-looking digits might have you going back to the dessert table for second (or third!) helpings.
Gobble Gobble! — This is most definitely the cutest turkey we've ever seen. You'll need a nail art brush and brown, black, red, yellow, white, and orange nail polish. Whew!
 Starting with your ring finger (don't worry, you'll get to the thumb later), take your yellow polish and create a straight line down the center of your nail. Thicken that line at the base and gradually swoop it out on both sides, into a fluted shape.
 Paint your thumb with the dark brown polish. Wait for it to dry, then use the orange polish to create a triangle-shaped "beak." Place two large dots of white polish just above the beak, then, while the white polish is still wet, place a tiny dot of black polish in each white circle. Now your turkey has googly eyes!
His feathered brethren may not be as lucky, but this little guy will definitely be sitting pretty come Thanksgiving Day.
Hope everyone enjoys their Thanksgiving with their loved ones and enjoys these Thanksgiving nails!!!!


